How to Use Adobe Photoshop for Beginners
How To Use Adobe Shop For Beginners
Introduction
Adobe photoshop is a powerful image editing software that allows you to enhance,
manipulate, and create stunning visuals. Whether you are a graphic designer, photographer, or hobbyist, learning the basics of photoshop can open up a world of
creative possibilities.
Step 1: Installing Adobe Photoshop
- Purchase and download Adobe Photoshop from the official Adobe website.
- Follow the installation instructions provided during the download process.
- Launch Photoshop after installation.
Step 2: Understanding the Photoshop Interface:
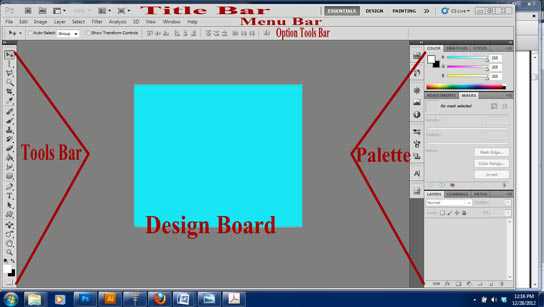
- Menu Bar: Located at the top, it contains various menus such as File, Edit, Image, etc.
- Toolbar: Found on the left side, it includes tools for selection, painting, text, and more.
- Options Bar: Situated below the menu bar, it displays options for the selected tool.
- Palettes: Windows like Layers, History, and Color are on the right. They help you manage and adjust your project.
Step 3: Opening and Creating a New Document:
Step 4: Basic Tools and Functions:
- Zoom Tool (Z): Enlarge or reduce the view of your image.
- Move Tool (V): Move elements within your project.
- Brush Tool (B): Paint and draw on your image.
- Eraser Tool (E): Remove parts of your image.
- Text Tool (T): Add text to your project.
Step 5: Layers:
Step 6: Basic Editing:
- Crop Tool (C): Crop and resize your image.
- Adjustments (Image > Adjustments): Modify brightness, contrast, and color balance.
Step 7: Undo and History:
- Use Ctrl + Z (Windows) or Command + Z (Mac) to undo actions.
- Access the History palette to revert to specific steps in your editing process.
Step 8: Saving Your Work:
- Save your project as a PSD file (Photoshop's native format) for future edits.
- Use File > Save As to export your project in different formats (JPEG, PNG, etc.).
Conclusion:
This beginner's guide covers the fundamental aspects of using Adobe Photoshop. As you become more familiar with the software, you can explore advanced features and techniques to take your creative projects to the next level. Happy editing!


Comments
Post a Comment